Monday, March 3, 2014

log

Step 36:  Rewire BMS current sensor and test heater.  In step 29 I mentioned that I needed to rewire the new school current sensor so that it would work better.  I did this using proper shielded cable and it no longer gets stuck.  Now I can log some driving and hone my efficiency.  

There are 2 routes I can take to work, one via highway 71 which is mosly 55+ mph, and one via Barton Creek which is mostly 35 mph.  The Barton Creek route is ~1 mile and a few minutes longer but 18% more efficient going to the office and 5% more coming home.  In addition to the speed I think other differences are stop sign or stop light placement with respect to the bottom of hills (bad!).

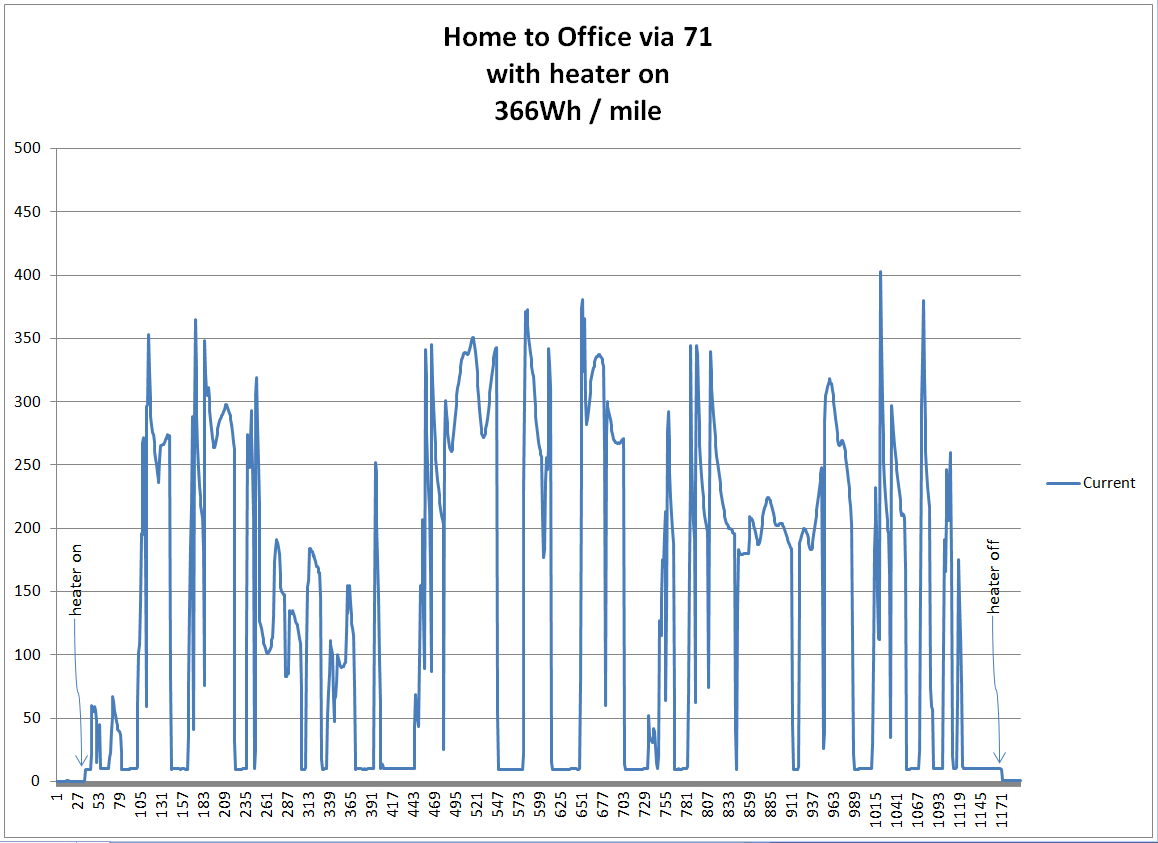
I was also able to test my heater.  It draws 900W from the battery and appears to increase energy per mile by 12% (reduce range by 12%).  It was in the mid-twenties and the heater kept the car warm enough that I wasn't freezing but there is room for improvement.  It was a strange sensation to smell electric heat in a car.

Notice the peak powers on the heater run are lower than the other runs.  That's because the battery was near freezing and cell resistance goes up with cold.  So its harder to get the amps out and I have to drive in a higher gear to get the same speed.


Wednesday, February 19, 2014

heat

Step 35:  Make heat.  A space heater and a 12V fan can deliver.  The heating element of a space heater will run off the direct current, it plugs into an extension cord under the backseat.  The extension cord comes from an Edison fuse on the battery posts of the motor controller in the trunk.  By tapping off the motor controller we can leverage the existing power relay that feeds the motor controller.  The heater will only work when the key is in the on position.

The fan of a space heater requires alternating current so I removed it to improve air flow.  Then I cut the back out of the space heater and mounted the 12V fan, face removed.  It plugs into the cigarette lighter.

The unit tucks under the dash or can sit on the passenger floor.  I get 500W of heat on low and 900W on high.  If 900W is not enough I will shorten the heating element to reduce its resistance, this will increase power.  The element can support 1500W.

It will have to get cold again before I can test it.  In the summer it will be stored in the trunk.  


heat!

left over parts


Saturday, October 26, 2013

balance

Step 34:  Watch cells balancing at night.  The battery side charging fuse is an Edison base type, 30A (it is rated for 125 volts alternating current but I've verified performance with direct current to be used plus I like its thrift - fuse holder is a ceramic flood lamp socket).  If needed I can do balancing sessions by swapping the fuse for a light bulb of chosen wattage to match the cell balancing load electronics.  A 200W light bulb limits the charge current to a little over half an amp.  My cell balancing loads are around a fifth of an amp, a 75W bulb.  A little imbalance may take a while to bleed off. 

Kits are available to increase balancing capability but I would avoid expense by manually bleeding the highest cell in the pack, and seeing how that went.

Every second the BMS communicates with the circuit board on each cell causing it to blink.  When a cell is being bled down to equalize the pack it leaves its light on.  I don't think I'll have to put up Christmas lights this year.


dc/dc

Step 33:  Install DC/DC converter to keep 12V system charged.  Up until now my 12V system has just been running off a 12V car battery.  This works but lights are dimmer and I would worry when having to run wipers and lights for extended periods.  The Mean Well S-350-12 DC/DC is wired to be on all the time.  It sits next to the motor controller in the trunk.


ac repair

Step 32:  Repair air conditioning.  A high side hose crimp blew while picking the kids up from school making a violent sound.  I had the hose repaired $20 and was pleased to see that the system was serviceable from underneath. Haste during the repair broke the condenser that came with the car.  So it was replaced with an aftermarket unit $84.  The system was open during some rain so the dryer $15 was also replaced before charging $32 back up.

broke


access

What you want is ~24psi on the
low side and 160psi on the high
side.  I left the high side
slightly lower, at 150psi.


new condensor


Thursday, October 10, 2013

revisit 24

Step 31:  Revisit step 24.  After tightening one of the charger output fuses the output jumped up 20A.  I can now fully charge in 5 hours.  The charger may be put in the trunk someday but for now I charge at home.  The charge stations in town cost 6x the rate I can get at home.

I replaced the charger outlet behind the drivers front wheel. 


26.7A


This charge is for a 31.7 mile drive, mixed driving, 60mph, some traffic, not hypermiling.  That's 333Wh/mile, or 100 miles per (cost of a) gallon (at $3/gal).

Wednesday, October 9, 2013

power brakes

Step 30:  Install power brake vacuum pump.  Without any vacuum one could sufficiently stop, but holding the car on a hill would get old quickly.  A purpose built electric vacuum pump and reservoir from an electric vehicle supply house is added to help out.


A bracket to hold the reservoir is fabricated, you may recognize it bolted to the top of the motor in step 5.


It fits in front of the battery.  The reservoir takes a few seconds to pump up after every application of the brake pedal.  It works really well!  Power brakes really improve the driving experience.